How to Upscale an Image: A Complete Guide to Increasing Resolution
tips tricksai technology⚡ 13 min read
RB
RemoveBgNow Vision Editorial
13 min read2,531 words
You've probably run into this before: a photo looks perfectly sharp on your phone, but the moment you try to print it, drop it into a slide deck, or blow it up for a website banner, it turns soft and blocky. Nothing about the picture changed — you just asked it to be bigger than it was ever meant to be.
That's the core problem image upscaling tries to solve. It won't work miracles, and it can't put back detail that was never captured in the first place, but modern upscaling tools — especially AI-based ones — can genuinely help an image look better at a larger size than simple resizing ever could. This guide walks through what's actually happening when you upscale an image, how to do it without wrecking the result, and what you should realistically expect.
What Does Image Upscaling Mean?
Every digital photo is made of a grid of tiny colored squares called pixels. A 1000×1000 image has a million of them. Resolution just describes how many of these pixels exist, and dimensions describe how they're arranged — width by height.
When you "upscale" an image, you're increasing its pixel dimensions: turning that 1000×1000 photo into something like 2000×2000. The tricky part is that the extra pixels don't exist yet. Something has to decide what color they should be, because the original photo never told you.
There's an important difference between two things people often lump together. Simply stretching an image — telling your computer to display a 500-pixel-wide photo at 1500 pixels — just makes existing pixels bigger and blurrier, the way a low-res image looks pixelated on a big TV. Intelligent upscaling, by contrast, tries to generate new pixel values that make sense given the surrounding image, so the result looks sharper and more natural rather than just stretched. Traditional software has done a version of this for decades; AI models do a more sophisticated version of the same basic idea.
Why Do People Upscale Images?
The reasons are usually practical rather than artistic. Printing is a common one — a photo that looks fine on a screen can appear grainy on paper because print resolution requirements are higher. Product photography and e-commerce listings often need a single source image resized for thumbnails, zoom views, and marketplace templates that expect a minimum resolution. Old family photos or images pulled from early digital cameras and phones are frequently far lower resolution than what we're used to today, and people want to display them on modern, larger screens. Presentations and websites sometimes need a hero image blown up to fill a banner. And on social media, a low-res upload can arrive looking soft after platform compression, when a slightly larger, cleaner source might have avoided it.
None of these use cases require perfection — they just require the image to hold up better at a larger size than it would if you resized it with basic tools.
How Does Image Upscaling Work?
💖
Enjoyed this article? Share it with others
Help fellow designers, sellers, and creators discover this guide.
Written and peer-reviewed by the RemoveBgNow team. We test and evaluate neural matting networks, e-commerce white background compliance, and high-resolution photo optimization.
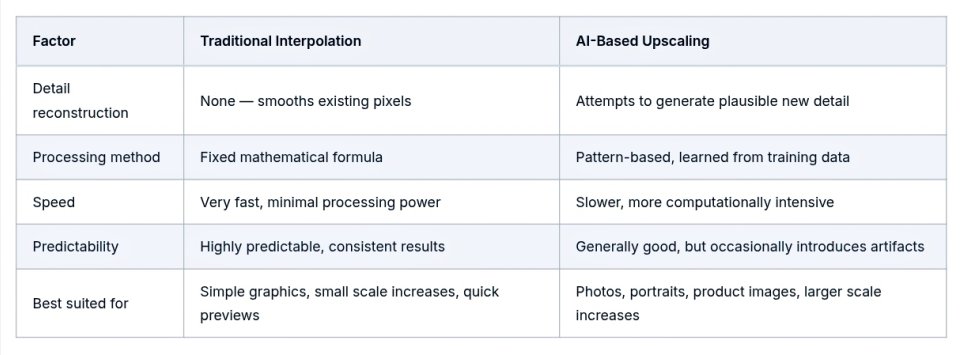
Traditional interpolation. Before AI, image editors used mathematical methods to fill in new pixels. Nearest-neighbor upscaling is the simplest and crudest: it copies the color of the closest existing pixel, which is fast but produces visibly blocky results. Bilinear interpolation smooths things out by averaging nearby pixels, and bicubic interpolation — the method behind most "resize" functions in Photoshop or similar software — looks at a wider neighborhood of pixels and produces a softer, more gradual result. These methods are reliable and predictable, but they can't invent detail. They can only smooth or blend what's already there, so heavily enlarged images still end up looking soft.
AI-based upscaling.AI upscalers, often built on neural networks trained on large numbers of image pairs, take a different approach. During training, the model is shown a high-resolution image and a deliberately degraded, lower-resolution version of it, and it learns to recognize patterns — how edges typically behave, how hair, fabric, or skin texture usually looks — so it can make an educated guess about what a sharper version of a low-res patch might look like. When you run a new image through it, the model isn't recovering the original scene; it's applying learned patterns to produce plausible-looking detail.
This distinction matters. AI upscaling can make a photo look convincingly sharper, but the fine detail it adds is a reconstruction, not a recovery. If a face was blurry because the camera never captured enough information about that eye or that strand of hair, the AI model is filling in its best estimate, not restoring exactly what was there. Most of the time, this works well enough to be genuinely useful. Occasionally, on very degraded or unusual images, the guesses are visibly wrong.
How to Upscale an Image
The workflow is straightforward, whether you're using desktop software or an online tool.
Start with the best original you have. A slightly larger or less-compressed source file will always upscale better than a heavily compressed screenshot of the same image.
Decide on your output size or scale. Think in terms of the final use — a 2x increase for a slightly bigger web image, or a larger multiple if you're preparing something for print or a big display.
Choose an upscaling method that fits the image. Photos with faces, skin, or organic textures generally benefit more from AI upscaling; simple graphics or pixel art sometimes look better with basic interpolation or specialized pixel-art scalers.
Check the details that are easiest to get wrong — faces, small text, hair, fine textures, and edges — since these are where artifacts tend to show up first.
Export in a format suited to the image. JPEG works for photos where a small amount of compression is acceptable; PNG is better when you need to preserve sharp edges or transparency, and it avoids introducing new compression artifacts on top of the upscale.
Compare the result against the original at 100% zoom before you use it, rather than judging from a thumbnail, where problems are much harder to spot.
How Much Can You Upscale an Image?
Modest increases — roughly 2x — tend to produce the most reliable results, whether you're using interpolation or AI. At 4x, AI upscaling still generally holds up on reasonably clean source images, though the model is doing more reconstruction work and the risk of odd-looking textures rises. Beyond that, results become increasingly unpredictable and depend heavily on what was in the original file.
It's worth being direct about a specific case people often ask about: a small, heavily compressed image — say, 200×200 pixels saved as a low-quality JPEG — cannot reliably become a sharp, high-resolution photograph just by increasing its dimensions. The compression has already thrown away information, and no upscaler can recover detail that a lossy file never preserved in the first place. An AI model can smooth over the blockiness and make an educated guess at texture, but it's generating plausible-looking content, not restoring the original scene. The right scale really does depend on both the quality of your starting image and what you intend to do with the result — a small boost for a web thumbnail is a very different ask than trying to turn a tiny thumbnail into a poster.
Neither approach is universally “better” — traditional interpolation is fast and dependable for modest resizes, while AI upscaling tends to produce noticeably sharper results on photographic content, at the cost of occasionally getting a detail wrong.
What Makes a Good Image Upscaler?
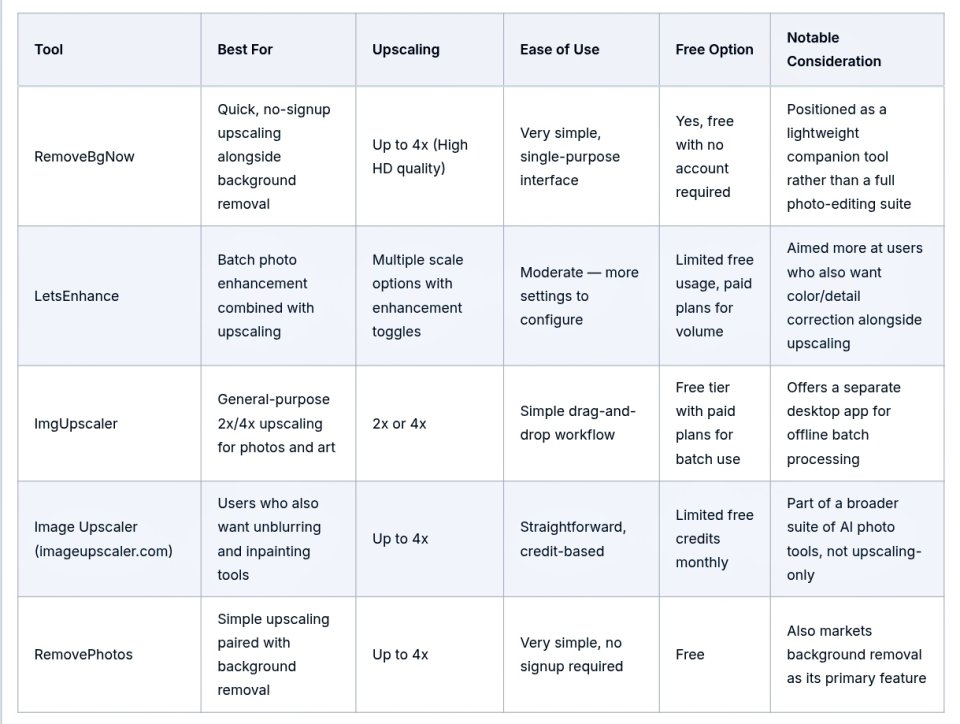
A handful of practical factors are worth weighing when choosing a tool. Output quality and how well fine details are preserved are the obvious ones, but it’s also worth looking at how a tool handles faces specifically, since faces are where flawed reconstructions are most noticeable. Text and hard edges are another common weak point — some upscalers blur small text into an unreadable smudge. Beyond quality, consider which file formats and maximum output resolutions a tool supports, how fast it processes images, whether it states a clear privacy or data-retention policy, how its pricing is structured (free, credit-based, or subscription), and simply how easy it is to use for the kind of work you do regularly. No single tool tends to lead in every one of these categories, so it’s worth matching the tool to what actually matters for your use case.
Best Image Upscalers to Consider
The tools below all offer some form of AI image upscaling. This list is meant to help you compare options, not to declare a single winner — the right choice depends on your workflow, budget, and the type of images you work with.
Each of these tools has trade-offs in speed, output ceiling, and how much control you get over the process, so it's worth testing a candidate on your own images before committing to one for regular use.
How to Get Better Results When Upscaling
The quality of your source file matters more than almost anything else you do afterward. A screenshot of an image is already a compressed, resized copy of a copy, so whenever possible, track down the original file rather than upscaling a screenshot of it. It also helps to avoid resizing an image multiple times in different programs before upscaling, since each resize can introduce its own softening or artifacts that the upscaler then has to work around. Pick a scale that matches your actual need rather than defaulting to the largest option available — a 2x increase is often enough, and pushing to 4x or beyond only when the use case genuinely calls for it reduces the chance of visible artifacts. If your original image already has visible compression blockiness, it's worth knowing that upscaling will often make that blockiness more visible rather than hiding it, so cleaning up compression artifacts first, where possible, tends to help. Sharpening should be applied carefully and after upscaling, since oversharpening an already-enhanced image tends to create a harsh, artificial look. Finally, always review faces and any text in the image closely, since these are the two areas most likely to reveal a flawed upscale, and choose your output format based on the image type — PNG for graphics or anything with transparency, JPEG for typical photos where some compression is acceptable.
Common Problems After Upscaling
A few recognizable issues tend to show up after upscaling, particularly with AI methods pushed to higher scales. Artificial-looking textures can appear, where skin, fabric, or foliage take on a slightly too-smooth or oddly repetitive pattern instead of natural variation. Halos — faint bright or dark outlines — sometimes form around high-contrast edges. Over-sharpening can leave an image looking crunchy or over-processed rather than genuinely clearer. Faces are particularly vulnerable to distortion, since small AI misjudgments around eyes, teeth, or skin texture are immediately noticeable to a human viewer. Small text can come out warped or unreadable if the model tries to “improve" character shapes it can't accurately interpret. Existing compression artifacts, such as blocky JPEG patterns, can become more visible rather than less. And in some cases, upscaling introduces excess noise or grain, especially when applied to an already noisy source image.
The best way to catch these problems is simple: view the result at full size, not as a thumbnail, and compare it directly against the original. If something looks subtly “off” around a face, a line of text, or a repeating texture, it’s worth trying a lower scale factor or a different tool rather than accepting the artifact.
Is AI Image Upscaling Worth Using?
For most practical situations — sharpening up a product photo, giving an old family picture a bit more presence on a larger screen, or preparing a web image for a slightly bigger placement — AI upscaling is a genuinely useful tool that outperforms basic resizing. It won't turn a blurry, low-resolution photo into a crisp professional shot, and it can't recover detail that a compressed or tiny original never captured. Where the source image already has reasonable quality and you're not pushing the scale too aggressively, the improvement is usually clear and worth the extra step. Where the source is severely degraded or you're hoping for a dramatic transformation, it's worth tempering expectations — the tool is making educated guesses, not performing restoration in the literal sense.
Conclusion
Upscaling an image is really about managing a trade-off: you're asking software to invent pixels that were never captured, and the goal is to do that in a way that looks natural rather than artificial. Traditional interpolation is predictable but limited to smoothing what already exists. AI-based upscaling can produce noticeably sharper, more convincing results, especially on photographs, but it works by reconstruction and estimation, not recovery — and it has real limits once you push scale or start with a badly degraded original. Whatever tool you choose, start with the best source file you can find, keep your scale realistic for your source quality, and always check the result closely — especially faces, text, and fine texture — before you use it.
Frequently Asked Questions
Q. What does it mean to upscale an image?
Upscaling means increasing an image's pixel dimensions — making it wider and taller in terms of pixel count — while trying to keep it looking sharp rather than simply stretched or blurry.
Q. Can you upscale an image without losing quality?
You can upscale without making an image look obviously blurry or blocky, especially with AI tools, but you can't add real detail that was never captured. “Without losing quality” in practice means the result looks clean and natural at the new size, not that it contains more true information than the original.
Q. Is AI upscaling better than normal resizing?
For photographic content, AI upscaling generally produces sharper, more natural-looking results than basic resizing, because it reconstructs plausible detail instead of just stretching pixels. For very simple graphics or small size increases, the difference is often minor.
Q. Is 2x or 4x upscaling better?
Neither is universally better — it depends on your source image and goal. 2x tends to be more reliable and produces fewer visible artifacts. 4x can work well on a clean, high-quality source, but the risk of odd textures or distortion increases as the scale gets larger.
Q. Can AI upscaling make a blurry image clear?
It can often make a blurry image look noticeably sharper by estimating cleaner edges and textures, but it can’t fully recover detail that was genuinely lost, such as fine detail obscured by motion blur or heavy compression.
Q. What image format is best after upscaling?
PNG is generally best for images with sharp edges, text, or transparency, since it avoids adding further compression artifacts. JPEG is fine for typical photos where some file-size compression is acceptable.
Q. How do I choose the right image upscaler?
Match the tool to your actual need: check how it handles faces and text specifically, look at its maximum resolution and supported formats, consider its privacy practices, and test it on one of your own images before relying on it for important work — rather than assuming any single tool is best for every type of image